Case 07:Temperature Sensor
Contents
9. Case 07:Temperature Sensor#

9.1. Introduction#
The temperature sensor is a kind of sensor that can detect temperature and transfer it into output data. The temperature sensor is the core component of temperature gauges and instruments with multiple categories. In this experiment, we are going to learn the analog temperature sensor–TMP36, and display its data on Pico:ed.
9.2. Products Link#
9.3. Components List#
Hardware:#
1 × Pico:ed
1 × USB Cable
1 × Breadboard Adapter
1 × Transparent Breadboard - 83 * 55 mm
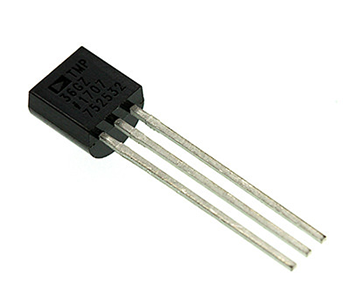
1 × TMP36 Temperature Sensor
n x Breadborad Jumper Wire 65pcs Pack
9.4. Major Components Introduction#
TMP36#
TMP36 is a kind of analog temperature sensor. Its output voltage and temperature forms a linear relationship. That means higher temperature will have bigger output voltage.
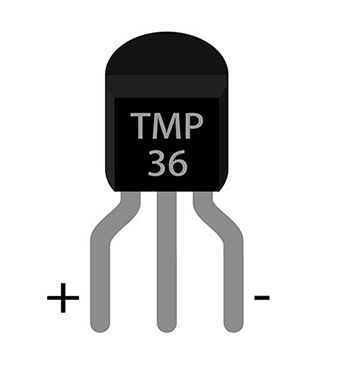
Note: When we look at the front side marked “TMP36”, the left side pin of the chip is VCC, middle is Vout, and the right side pin is GND. Do not connect it wrong or the components connected might be damaged.
Here’s the curve chart for output voltage of TMP36 changing with temperature:
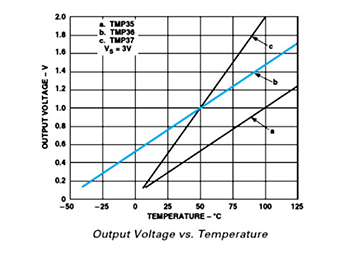
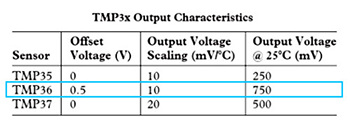
We can know from the above chart that the temperature formula is:
Temperature(℃)=(Output Voltage(mV)-500)/10
9.5. Experimental Procedure#
Hardware Connection#
Connect your components according to the picture below:
Connect the sensor to P0 port of the breadboard adapter.

You would see as below after you finish the connection:
9.6. Software Programming#
For programming environment preparation, please refer to Introduction to the programming environment
Program as the picture shows:#
# Import the modules that we need
import board
import digitalio
import analogio
import picoed

# Set the pins of the [Pico:ed](https://shop.elecfreaks.com/products/elecfreaks-pico-ed-v2?_pos=2&_sid=e7433427a&_ss=r)'s temperature sensor
temperature = analogio.AnalogIn(board.P0_A0)

# Display the temperature value detected by the temperature sensor
while True:
   # Convert analog value (0-65535) to voltage (0-3.3v)
   voltage = temperature.value * (3.3 / 65535)
   temperature_value = (voltage - 500) / 10
   picoed.display.scroll(temperature_value)
Details for the code:#
1.Support modules are required by the importer. The board module is a generic container for pin names. could use the board module to specify the pin to use. The digitalio module contains classes that provide access to basic digital IO. The time module contains functions for time settings.
import board
import digitalio
import analogio
import picoed
2.Set the pins of the Pico:ed temperature sensor.
temperature = analogio.AnalogIn(board.P0_A0)
If you are using pins other than P0_A0 and P1_A1, you can enter the following code in the shell window below the Thonny editor and press Enter to view the numbers of other pins.
>>> import board
>>> help(board)
object <module 'board'> is of type module
  __name__ -- board
  board_id -- elecfreaks_picoed
  BUZZER_GP0 -- board.BUZZER_GP0
  I2C0_SDA -- board.BUZZER_GP0
  I2C0_SCL -- board.I2C0_SCL
  BUZZER -- board.BUZZER
  BUZZER_GP3 -- board.BUZZER
  P4 -- board.P4
  P5 -- board.P5
  ...
3.Use an infinite loop to display the value detected by the temperature sensor to the Pico:ed’s LED screen.
while True:
   voltage = temperature.value * (3300 / 65535)
   temperature_value = (voltage - 500) / 10
   picoed.display.scroll(temperature_value)
9.7. Results#
The current temperature value is displayed on the Pico:ed screen.
9.8. Exploration#
If we wanted to display the temperature in Fahrenheit on the Pico:ed screen, how would we program it?