😊New Customer Discounts😊All Order Get 5% Off.
Menu


Today, we are going to make an ultrasonic distance tester with micro:bit and ultrasonic sensor module.
1 x BBC micro:bit 1 x Octopus:bit 1 x OLED module 1 x HC-SR04 ultrasonic module
HC-SR04 is a kind of ultrasonic distance measuring modules. With this module???we can detect the space time between ultrasonic send and return, then convert it into distance. Here’s the basic principle:
Distance=(high electric level time x sound space (340m/s))/2 Note???/strong>Find in the MakeCode for the already sealed ultrasonic library. You don’t have to write any complicated drive code but just simplly invoke the library.
You can refer to the column below for the connection between ultrasonic module and octopus:bit
| ultrasonic module | octopus:bit |
|---|---|
| VCC | VCC |
| GND | GND |
| TRIG | P14 |
| ECHO | P15 |
Since the driving voltage of SR04 ultrasonic module is 5V, so we must slide the voltage switch on octopus:bit to the end of 5V.
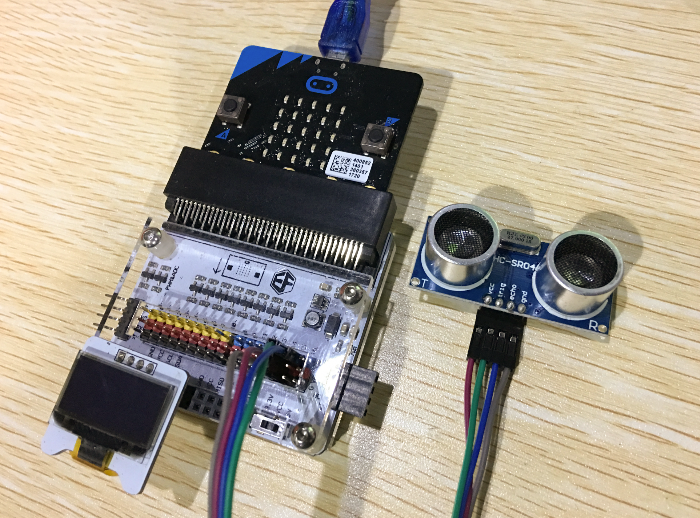
Plug OLED module into IIC cpnnector on octopus:bit.
Once connected, you can see the following picture showed:

Click to open https://makecode.microbit.org/and enter the programming interface.
Search sonar in ADD Package, then add the ultrasonic library.
Search OLED in ADD Package, then add the library for OLED module.
Initialize OLED screen.
Set the pin trig to be P14 and the pin echo to be P15 with cm as unit. And display the data returned on the OLED screen.
When you finished your program, you can get the whole code from this link???a href=”https://makecode.microbit.org/_CtF2K5HTkarf”>https://makecode.microbit.org/_CtF2K5HTkarfOr you can download the code into micro:bit directly through the web page below.
Now you have already successfully created a set of ultrasonic measuring device. Point the ultrasonic head to the object you would like to test, then you will see the distance between on the OLED screen.
Stay up-to-date with our latest promotions,discounts,sales,and special offers.