
Friday Product Post: Rainbow LED Series and Micro:bit Kit
January 7, 2019
8*8 Rainbow LED Matrix Snake Game
January 8, 2019In this article we will tell you how a maker planed for his Halloween day and a good news: Elecfreaks is going to start a promotion during Halloween Festival. Our online store will have 15% off( except for some designated products).
Halloween is coming soon. We can find various Halloween theme products on the supermarket shelves like pumpkin ghost faces, masks, cloaks, etc.. What do you plan to decorate yourself in Halloween day? Everyone in Halloween party wants to stand out and be the most special one. As a creative maker, will you satisfy devices purchased from supermarket only? No! No way! We want to be the most creative and most special one! Today, let’s make a special Halloween mask. I am sure you will attract all people surrounding you. So let’s take a look how to make it!
Materials we need:
1 × Mask (You can buy one from a supermarket or store nearby.)
1 × Micro:bit Board with Battery Holder kit
2 × 8 RGB Rainbow LED Ring
1 × 8 RGB Rainbow LED Strip
We also need tools like a soldering iron, jumper cables, etc.. Picture below is what I bought from a supermarket. Let’s start to change it with our creation!
Procedure:

Step 1: Cable Connection
We are going to use two 8 RGB LED rings to make eyes and one 8 LED strip to create mouth. In order to minimize control end of rings, I plan to use one IO to control two eyes. So I connect two LED rings in parallel. You can connect cables according to the picture below.
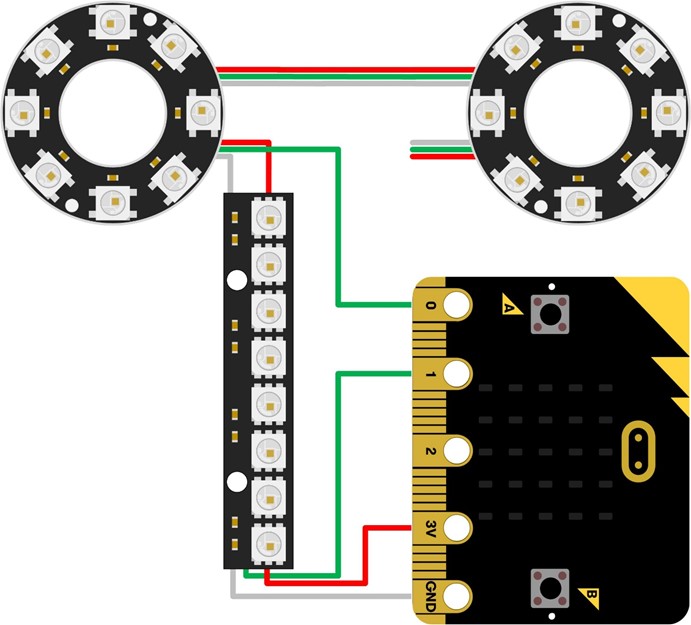
Note: Please pay attention to the cable length. If the cable is too long, it will make the mask messy inside.
Step 2: Install Eyes
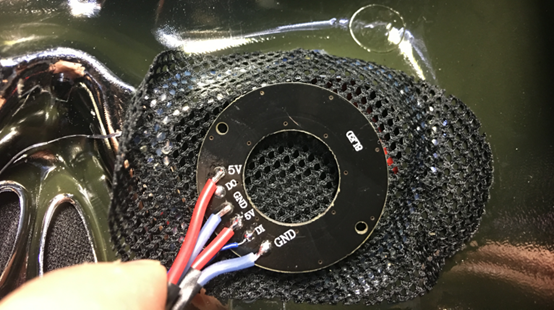
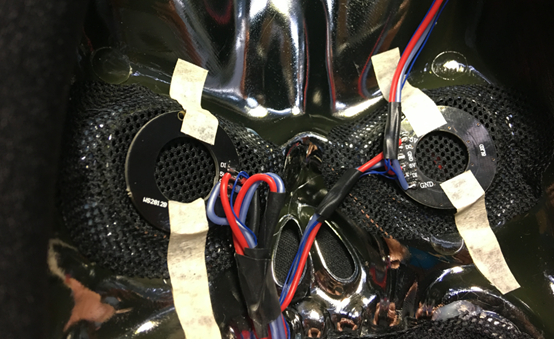
Fix LED rings and make them look like two eyes.
Step 3: Install Mouth
Fix LED strip. Here we place the strip behind the mask teeth and try to hide it well so that others will not find it. .

Step 4: Connect Micro:bit
After we installed LED rings and the strip, we can find there are four lines. They are ring signal line, strip signal line, VCC, GND separately. We have to extend the 4 lines and connect it to micro:bit. Here, I plan to hide micro:bit in my right sleeve. A clever idea, right?
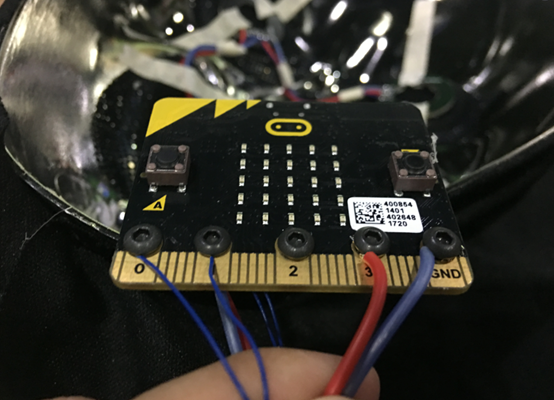
Then we need to connect strip signal line to port P1 on micro:bit and ring signal line to P0. Till now, we have finished all hardware connection. Next step, we are going to program for it. Firstly, let’s try to light all LED beads.
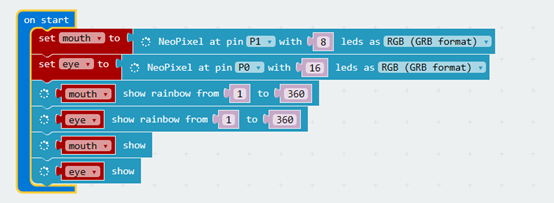
Write the code above into micro:bit. If you are still not very clear about micro:bit programming, you can refer to this article:Start Your Micro:bit Programming Trip. After we downloaded the program, we can see our mask becomes the following picture showed.

Want to make the eyes more animative? Then try the sensor on micro:bit! Shake micro:bit, the eyes will turn to another color. Seems so magic!
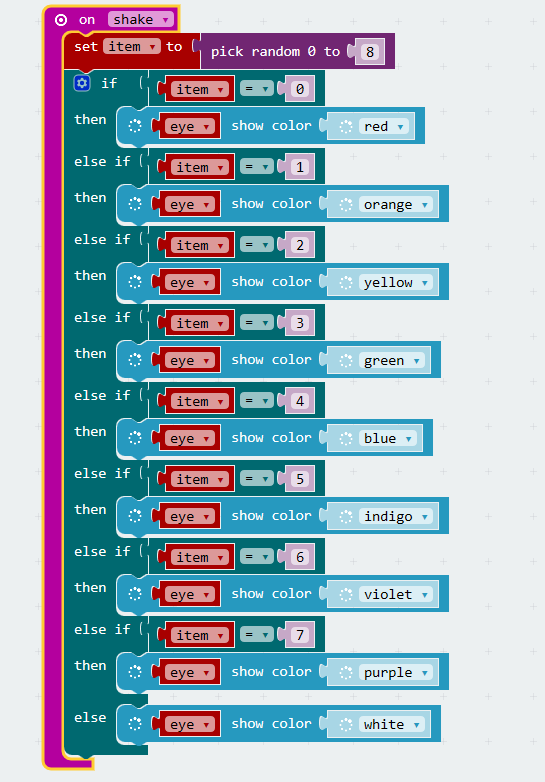
If you want to know the whole program, you can refer to the link below. You can download the code directly into micro:bit.
Now, all is well done. Let’s take our mask and see the final effect!
https://www.youtube.com/watch?v=uZrAWWMFI-s&feature=youtu.be
Looks great, huh? We have published a series of new products based on WS2812B bead in our online store. It is RainbowLED series, which includes all kinds of LED strips, LED rings and LED dot matrixs. You can place an LED ring in front of your chest so that you obtained an energy ring just like a superman. You can also stitch LED strips all around your body to make yourself look like a matchstick man. Even, you can use Flexible Rainbow LED Matrix to make a clothes for your lovely pet. There are more creative thinking in your head. Just take a good advantage of your imagination, decorate yourself smart with Rainbow LED. I believe you will become the most shining super star in your Halloween party.
Relative Readings: Get to Know WS2812b Micro:bit Experiment 11: Rainbow LED Ring —— Elecfreaks Mirco: bit Starter Kit Course Light the First Bead on 8*8 NeoPixels Matrix with Arduino 8*8 Rainbow Matrix Pattern Display 8*8 Rainbow Matrix Scrolling Caption 8*8 Rainbow LED Matrix Snake Game


